
Welcome To The Home Of Dj/Producer At One
Showing posts with label DJ Techniques / Tips. Show all posts
Showing posts with label DJ Techniques / Tips. Show all posts
Tuesday, 19 February 2013


Tuesday, 2 October 2012
Four Creative Techniques For Using Traktor & Ableton Together (Video)
This article was sourced from: djtechtools.com
The combination of Traktor and Ableton in a DJ setup is a toolkit that (for now) is unparalleled for performers looking for versatile software solutions. We’ve read plenty of tutorials on how to sync Traktor and Ableton, but where most of them stop at a simple how to, today’s video focuses on why. Learn how to use four solid techniques that combine the best of both worlds in the video inside, and download a free template to try it out yourself!
The combination of Traktor and Ableton in a DJ setup is a toolkit that (for now) is unparalleled for performers looking for versatile software solutions. We’ve read plenty of tutorials on how to sync Traktor and Ableton, but where most of them stop at a simple how to, today’s video focuses on why. Learn how to use four solid techniques that combine the best of both worlds in the video inside, and download a free template to try it out yourself!
THE TECHNIQUES
For simple reference, here are the four techniques we show off in today’s video:
Technique 1: Traktor plays a song while Ableton runs MIDI loops on a drum machine (which is manipulated live). In this example, Traktor audio is side-chaining to the drum machine, creating a tight mix.
Technique 2: Traktor provides a beat (this example is perfect for house) while Ableton runs a MIDI loop on a synthesizer (Operator is used in the video) that does live synthesis, side-chained to the Traktor beat.
Technique 3: Old school beat and scratching from Traktor, which does live side-chaining to the finger drumming in Ableton.
Technique 4: Straight-up scratch routine and finger drumming jam (no tracks, no loops, all live) while Traktor signal side-chains to the finger drumming.
Monday, 16 January 2012
Ableton Live Tips: Launch Properties and Follow Actions
Cool tips for all you Ableton Live users; if you’ve been wanting to get a little deeper below the surface and find out how you can really customise Live into the rig of your dreams then you really should know how you can manipulate the Launch Properties of the clips you use, including Follow Actions.
It’s not that difficult to get your head around how to get these tricks to work for you, but it’s probably easier if I just show you. I’ve recorded a video to help bring you up to speed:
To recap:
To get more interesting behaviour out of Live, we can change clips’ launch properties. In the video I show how we can use these techniques to get two different effects.
In the first example I take four drum loops that are each two bars long and put them all in the same track, which by default makes each cut the other off, inheriting the global launch quantisation when triggered.
To change this I can do a couple of things, and it all starts by unlocking the Launch Properties viewer for clips, located at the bottom of the clip properties view hidden behind a small L in a circle. First off changing the clip launch mode to Legato will stop the clips launching from the beginning no matter what timing they’re triggered with, instead allowing them to pick up the timing of the previous clip. Because the clips all have the same timing (if layered on top of each other they would play together), enabling Legato for each clip will mean that when we switch between clips we’ll get an effect akin to chopping between channels with a crossfader – we can make this effect further pronounced by tightening the launch quantisation settings or even switching them off as I do in the video.
The clip switching itself can be automated with Follow Actions; upon launching the clip, something else can be set to happen a certain amount of time. There’s a bars/beats/16ths timing selector, and in the video example I decide to make Live switch between loops automatically on every 8th, so I set the last of the boxes – the 16thnote selector – to 2 (2/16ths equals 1/8th). We can then select two actions that will happen this amount of time after the clip is triggered and the ratio chance of each happening; in the video I decide I want it equally likely that any of the four clips will play next so I select Any in one box, and because I always want that to happen, I leave the next action blank but set the ratio of ‘switching to any’ vs ‘staying put’ to 999:0. As long as the No Action (‘staying put’) action has zero chance of happening, it doesn’t matter what the other option is set to, of course. Now when played, there’s a 3:1 chance that the loop will switch to another loop – there’s a 1:3 chance it will stay on the same loop – so as you can see, there’s multiple ways to consider the logic of Follow Actions.
In the second example I set a one bar loop up to sequence itself in 8th notes in the clip sequencer. By duplicating the single bar into eight versions of itself (right click > Duplicate or Cmd/Ctrl+D) on the same track, we now have eight potentially different versions of the loop to trigger.
By changing the start point of each loop to stagger them an 8th further in time for each one going down, we make it so that triggering each version of the loop chops us to a different point in time. Because we’ve set the start point of the clips up manually, this time we’re going to leave Legato mode off.
In order to create a visual representation of the loop’s sequence, we’re going to set the Follow Actions of the clips to make them play the Next clip in the sequence an 8th (the amount of time, in this example, between each ‘chop’) after they’re triggered. Of course, for the final clip the sequence needs to return to the beginning, so for that clip we need to jump to the First in the track. We use the same logic as the first example for the Follow Actions: the first action is Next (or First) and the second is No Action, with odds of 1:0.
So, here are the main points:
- Launch properties work on audio and MIDI clips.
- The numbers at the bottom of the follow actions are the ratio likelihoods of them happening. If one’s zero, it doesn’t matter what you set the second to – it’ll happen 100% of the time (unless it’s also zero of course!). You could also think of this as the ‘odds’ of the action occurring.
- You can select multiple clips to save the tedious act of changing every clip individually.
- A big advantage to this is that if you have a controller with visual feedback for playing clips – like pads that light up – you’ll get a fantastic real-time step sequencer in front of your eyes.
- You can get really deep with the ratios of things happening, so experiment – but don’t get bogged down with automating everything to the point where there’s no point in you even being there!
Originally posted:-
http://www.djtechtools.com/2012/01/03/ableton-live-tips-launch-properties-and-follow-actions/
Thursday, 15 December 2011
Filter VS EQ: Which, When, Why?
Written by Chris Cartledge


Okay, if one was better than the other, top flight mixers would only have one – right? Yet it tends to be the cream of the crop that feature both. Why is this, and when should you be using which?
BACK TO BASICS
Not to confuse you, but EQs are a form of filter. The bottom line is that a filter takes a sound input, applies a rule to it, and then outputs its modified version. Whether that’s an EQ/tone, low pass, high pass, band pass, notch, or any number of others, filter is as filter does – but when we talk about filters on DJ mixers we just mean that single knob that sweeps across the entirity of the track.
The image above represents a low pass filter’s frequency response. A DJ filter, when integrated into a mixer, is almost always, nowadays, a dual mode affair; the central detent is the off position and a clockwise and anti clockwise motion respectively take care of high and low pass filtering (the Vestax mixer in the header is an uncommon exception… but it’s a very pretty mixer so we thought it was worth the confusion. Allen & Heath have also traditionally used filters that switch modes with a button). ‘High pass’ and ‘low pass’ are pretty well termed in that they, as they are ramped up, have a progressively smaller guest list, so to speak, and the frequencies allowed through are whittled down until only the very lowest/highest are allowed past.
EQ, on the other hand, tends to have three ‘bands’ – think of them as areas of influence over frequencies in the track – but sometimes have two (ala the lower end Vestax PMC mixers) or even four (the Allen & Heath Xone 62/92, for instance), and the most notable thing that a DJ filter doesn’t do that the EQ section does is boost. All the filter does is reduce the amplitude of frequencies; turn your EQ clockwise and it will make the frequencies in its domain more powerful.
One of the big advantages to a filter is the way that there’s just the one knob to worry about. Mixing with a filter can be really subtle, because of the smoothness with which frequencies are added to (or taken away from) the mix.
Mixing with EQ brings with it the advantage of a high level of control, at the expense of the sweeping smoothness of a filter. Whilst it’s difficult to create a smooth sweeping frequency effect with channel EQ on account of the reality of dealing with a knob for every EQ band, it’s not only simpler to pinpoint a specific problem point or sweet spot with EQ but is the only way to isolate the mid range of your audio as well as both top and bottom end.
CHARACTER WITNESS
If all filters were born equal, then there’d be no arguments over who had the best – and we all know that’s not the case. A good DJ filter isn’t completely flat; a good DJ filter has character over and above simply ‘turning the sound down’. All the things that make one filter sound different to another are actually quite involved so we’ll leave the nitty gritty for another day, but two of the big ones are steepness and resonance. The steeper a filter’s cutoff is, the harder frequencies are attenuated when they pass the threshold. An exceptionally steep filter will completely kill frequencies more or less as soon as they fall outside the cutoff point, whereas a gentler one will attenuate the frequencies smoothly as they’re cut out. This steepness curve is measured in dB per octave, and typically speaking DJ filters are quite, but not ruthlessly, steep. Resonance (often called Q) is the amount by which, just at the cusp of the cutoff point, frequencies are actually boosted with a little hump before they’re cut out. The more Q a filter has, the more of a warbly, ‘singing’ sound it creates as it’s turned, and this characterfulness creates two camps: those that love it, and the more the better, and those that hate it.
The smoother a filter, the more clinical and precise it is and thus the more accurate for using as a blend control, but at the same time the less musical it tends to sound. Different manufacturers and software developers give their filters different characteristics – and in this digital age, many are building in the opportunity to choose the style you prefer in settings.
TECHNIQUE
If you’re DJing with only the biggest, boldest, brightest confirmed dancefloor destroyers, and especially if they’ve never been out of the digital domain, using EQs for technical rather than creative reasons might be a foreign concept. If, however, your selections are a mixed bag of different eras, genres, formats – especially vinyl – and top-secret work in progress dubs, you’ll know that a little EQ goes a long way to bridging the gaps between how two tunes are mixed (and I mean mixed in the engineering sense here), and this is definitely the area in which EQ shines.
The ‘highs for high hats, mids for vocals and lows for bass’ mantra that many a DJ spits out whenever EQ is mentioned is a pretty big over-simplification, but it’s not one without foundations. Matching the levels of not just the general volume of the tracks you’re playing, but also their composition, will make for a smoother mix. Got some 80s house that just doesn’t thump as hard as 2011’s sonic pallet? Perhaps some bass is in order. The sound coming off your records a little harsh compared to the digital smoothness of your latest Beatport wavs? A little tweak to the mids should sort that out. You may even be the kind of perfectionist that, armed with the power to twist, stretch, and massage tracks, always has a hand hovering over the EQs to smooth out any changes in the tracks. But with all this technical tweaking, your EQ dials resembling the London/New York/Sydney world clocks in a high end board room, how do you fit in the creative frequency fiddling without losing your consistency? You guessed it.
DJ filters are, I’m fairly sure without exception, post-EQ (please let us know if you know any otherwise!). Whatever those EQ dials are doing, they’re doing it before the sound gets into the filter. This means that the filter’s effect on the track remains consistent no matter what’s going on up there, and so you can use the EQs to dial in the perfect character for the track – the setting at which all your tracks match each other tonally – and leave the filter to provide the artistic flair and frequency led mixing and blends.
TOP TEN TIPS FOR SUCCESSFUL SOUND SCULPTURE
- Don’t forget your gain when you EQ!
- Use filters to allow you to make creative sweeps to the track and still be able to go back to the tuned EQ setting.
- Experiment with the filter Q types available to you to find your favourite.
- If you use a chunky Q, ride it rhythmically to get the track to ‘sing’!
- If you don’t have filters available on your gear, practice using your EQs to get a sweeping effect by twisting the high, then high and mid, then mid and low, then low down to the bottom (or vice versa).
- A filter sweep to bring a track in can sometimes sound a lot more natural than fading it in with the volume fader.
- If you mix out by using filters, be wary of the filter not totally closing the track out; always finish a mix with a volume fader to avoid issues.
- If your mixer doesn’t have mid EQ but you need some mid-range adjustment, try boosting high and low while cutting gain or vice versa.
- Use filters for creative effect; ‘pump’ the filter rhythmically to make tracks wobble much more than an EQ tweak.
- Remember: mix the overall sound of the tracks together with EQs, and then use filters to perform sweeps and blends
Originally posted: http://www.djtechtools.com/2011/12/07/filter-vs-eq-which-when-why/
Tuesday, 29 November 2011
Getting Creative With Serato Scratch Live
We tend to focus a lot on Traktor in our controllerism articles because of its simpler and more flexible controller mapping capabilities, but there are a fair few hidden – or at least, subtly introduced – features that make controllerism in Scratch Live a lot of fun too. While many “Serato” djs may stick to the basic 1 +1 deck paradigm, there are now a lot of additional tools that allow for tinkering if you are so inclined.


Serato appears to have made a conscious decision to make mapping MIDI controllers simple, and it is somewhat at the expense of power. For instance, mapping a MIDI control to more than one Scratch Live function isn’t possible… but to mitigate that, Serato have integrated the Super Knob and Ultra Knob concept. They’ve also made it impossible to map buttons to dials and vice versa, but their way of working provides a loose workaround for the effects you might want to achieve by performing such a thing.
Important! Before you start, go into the MIDI page of the setup window and create a new MIDI preset. After you’ve made changes, save. If you don’t do this, all your hard work will be lost when you quit. Not fun.
BUILT-IN SMARTS
Scratch Live’s effects sit somewhere between Traktor’s group and advanced modes, with two assignable banks of three effects that can each be expanded to show their advanced controls. So, whilst Scratch Live only has two banks maximum, each bank has three effects that are always highly configurable – here are some advanced tips for creating effects behaviours.
The super knob concept allows you to create relative relationships between an effect’s main dial and its advanced parameters. The ultra knob goes a step further and allows you to create the same relationships between the three main effect knobs and an ‘omni knob’ for each bank. Here’s how:
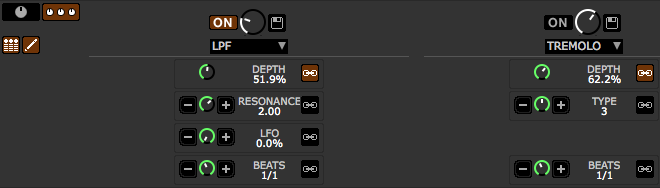
- Click the expand button (pictured) to show an effect’s advanced controls.
- Now, press the newly visible pencil button, which will open up the relationship controls.
- Move the dial to where you want it to be when the main dial is fully anticlockwise (‘off’) and press the ‘-‘ button.
- Now move the dial to where you want it to be when the main dial is fully clockwise (‘on’) and press the ‘+’ button.
- Make sure the link button is engaged.
Now when you turn the main dial, the advanced dials will turn the amount you’ve set up. If you set the controls to the opposite of the main dial – so that the advanced dial turns clockwise when the main dial turns anticlockwise – then the ring around the dial will be red instead of green.
PUSHING THE ENVELOPE
The super knobs and ultra knobs are obviously very powerful, but using Scratch Live’s native capability we’re limited to just one super knob per effect or one ultra knob per bank. If we use our MIDI intermediary software we can create as many as we like.
In testing, I learned two things about how Scratch Live treats MIDI input. Firstly, it’s got no issue with commands coming in simultaneously and so we don’t have to worry about creating delays between our message splitting. Secondly, it won’t learn the second in a string of MIDI commands even if you do put a delay in, so it’s necessary to build the MidiPipe template up with these steps:
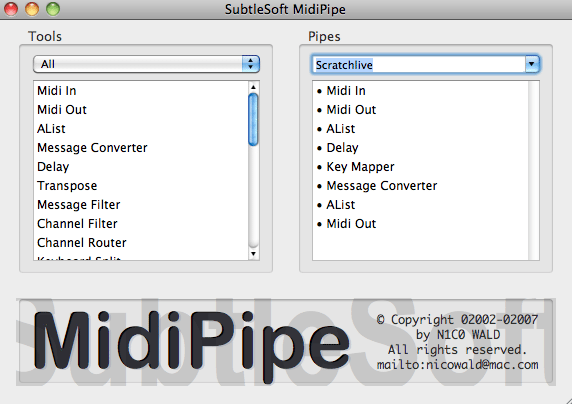
- Set up a MIDI in in your MIDI software.
- Set up a MIDI out to go to ‘Scratch Live MIDI in’ in the software, and ensure that ‘pass through’ is enabled.
- ‘Learn’ the first command in Scratch Live.
- Add a message converter, change the CC of your control to something else (it’s a good idea to plan out what you’re doing to avoid a mess down the road) and put it after the first MIDI in in your MIDI software.
- Now that the control has been switched, go back to Scratch Live and learn the next command.
- Return to the MIDI software and move the message converter to the end of the pipe, adding another MIDI out after it.
- For extra controls, repeat from Step 4.
THE NON-EFFECT EFFECTS
Scratch Live doesn’t count censor or loop roll as effects – this means that they can be used without taking up a slot in your DJ-FX rack. Whilst that’s all good, it also means they can’t be hooked up to super or ultra knobs, and so if we want to use them to their full potential we need to get a little creative with MidiPipe or the equivalent.
Here’s a trick that, whilst not super new, may have passed you by: instead of mapping a single loop roll button, you can map as many as you like to individual loop roll lengths by pressing ctrl+alt+click on the loop button in MIDI mode.
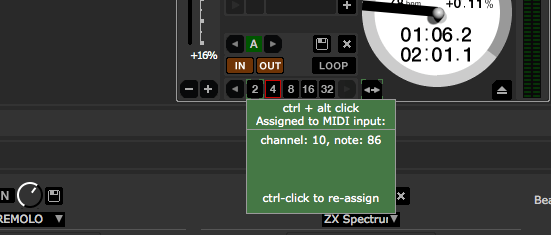
In a similar shortcut to the loop roll trick mentioned above, you can also ctrl+click on the effects activation buttons to turn them into momentary triggers. Try assigning loop roll activation and effects activation to the same button by creating a basic key mapper MIDI pipe and using these hidden momentary press controls for some very cool effects!
As a final note, because censor’s a button and Scratch Live doesn’t allow buttons to be triggered by specific values of CCs, we have to do some jiggery pokery in our MIDI software and turn our CC message into a note message. I use MidiPipe often because it’s very quick and easy to use, but when it gets to the more complicated actions, Bome’s Midi Translator Pro is the way to go. What we need to do is tell Midi Translator to turn only the final value on a single CC message (127, or 7F in hex) into a note on message, and also that the next one below (126, or 7E in hex) into a note off message. This will allow us to create a knob that can be assigned as we wish, but at the very end of its throw also sends things into reverse!
Subscribe to:
Posts (Atom)