
Welcome To The Home Of Dj/Producer At One
Showing posts with label Advanced Digital DJ Tips. Show all posts
Showing posts with label Advanced Digital DJ Tips. Show all posts
Tuesday, 19 February 2013


Monday, 16 January 2012
Ableton Live Tips: Launch Properties and Follow Actions
Cool tips for all you Ableton Live users; if you’ve been wanting to get a little deeper below the surface and find out how you can really customise Live into the rig of your dreams then you really should know how you can manipulate the Launch Properties of the clips you use, including Follow Actions.
It’s not that difficult to get your head around how to get these tricks to work for you, but it’s probably easier if I just show you. I’ve recorded a video to help bring you up to speed:
To recap:
To get more interesting behaviour out of Live, we can change clips’ launch properties. In the video I show how we can use these techniques to get two different effects.
In the first example I take four drum loops that are each two bars long and put them all in the same track, which by default makes each cut the other off, inheriting the global launch quantisation when triggered.
To change this I can do a couple of things, and it all starts by unlocking the Launch Properties viewer for clips, located at the bottom of the clip properties view hidden behind a small L in a circle. First off changing the clip launch mode to Legato will stop the clips launching from the beginning no matter what timing they’re triggered with, instead allowing them to pick up the timing of the previous clip. Because the clips all have the same timing (if layered on top of each other they would play together), enabling Legato for each clip will mean that when we switch between clips we’ll get an effect akin to chopping between channels with a crossfader – we can make this effect further pronounced by tightening the launch quantisation settings or even switching them off as I do in the video.
The clip switching itself can be automated with Follow Actions; upon launching the clip, something else can be set to happen a certain amount of time. There’s a bars/beats/16ths timing selector, and in the video example I decide to make Live switch between loops automatically on every 8th, so I set the last of the boxes – the 16thnote selector – to 2 (2/16ths equals 1/8th). We can then select two actions that will happen this amount of time after the clip is triggered and the ratio chance of each happening; in the video I decide I want it equally likely that any of the four clips will play next so I select Any in one box, and because I always want that to happen, I leave the next action blank but set the ratio of ‘switching to any’ vs ‘staying put’ to 999:0. As long as the No Action (‘staying put’) action has zero chance of happening, it doesn’t matter what the other option is set to, of course. Now when played, there’s a 3:1 chance that the loop will switch to another loop – there’s a 1:3 chance it will stay on the same loop – so as you can see, there’s multiple ways to consider the logic of Follow Actions.
In the second example I set a one bar loop up to sequence itself in 8th notes in the clip sequencer. By duplicating the single bar into eight versions of itself (right click > Duplicate or Cmd/Ctrl+D) on the same track, we now have eight potentially different versions of the loop to trigger.
By changing the start point of each loop to stagger them an 8th further in time for each one going down, we make it so that triggering each version of the loop chops us to a different point in time. Because we’ve set the start point of the clips up manually, this time we’re going to leave Legato mode off.
In order to create a visual representation of the loop’s sequence, we’re going to set the Follow Actions of the clips to make them play the Next clip in the sequence an 8th (the amount of time, in this example, between each ‘chop’) after they’re triggered. Of course, for the final clip the sequence needs to return to the beginning, so for that clip we need to jump to the First in the track. We use the same logic as the first example for the Follow Actions: the first action is Next (or First) and the second is No Action, with odds of 1:0.
So, here are the main points:
- Launch properties work on audio and MIDI clips.
- The numbers at the bottom of the follow actions are the ratio likelihoods of them happening. If one’s zero, it doesn’t matter what you set the second to – it’ll happen 100% of the time (unless it’s also zero of course!). You could also think of this as the ‘odds’ of the action occurring.
- You can select multiple clips to save the tedious act of changing every clip individually.
- A big advantage to this is that if you have a controller with visual feedback for playing clips – like pads that light up – you’ll get a fantastic real-time step sequencer in front of your eyes.
- You can get really deep with the ratios of things happening, so experiment – but don’t get bogged down with automating everything to the point where there’s no point in you even being there!
Originally posted:-
http://www.djtechtools.com/2012/01/03/ableton-live-tips-launch-properties-and-follow-actions/
Tuesday, 29 November 2011
Getting Creative With Serato Scratch Live
We tend to focus a lot on Traktor in our controllerism articles because of its simpler and more flexible controller mapping capabilities, but there are a fair few hidden – or at least, subtly introduced – features that make controllerism in Scratch Live a lot of fun too. While many “Serato” djs may stick to the basic 1 +1 deck paradigm, there are now a lot of additional tools that allow for tinkering if you are so inclined.


Serato appears to have made a conscious decision to make mapping MIDI controllers simple, and it is somewhat at the expense of power. For instance, mapping a MIDI control to more than one Scratch Live function isn’t possible… but to mitigate that, Serato have integrated the Super Knob and Ultra Knob concept. They’ve also made it impossible to map buttons to dials and vice versa, but their way of working provides a loose workaround for the effects you might want to achieve by performing such a thing.
Important! Before you start, go into the MIDI page of the setup window and create a new MIDI preset. After you’ve made changes, save. If you don’t do this, all your hard work will be lost when you quit. Not fun.
BUILT-IN SMARTS
Scratch Live’s effects sit somewhere between Traktor’s group and advanced modes, with two assignable banks of three effects that can each be expanded to show their advanced controls. So, whilst Scratch Live only has two banks maximum, each bank has three effects that are always highly configurable – here are some advanced tips for creating effects behaviours.
The super knob concept allows you to create relative relationships between an effect’s main dial and its advanced parameters. The ultra knob goes a step further and allows you to create the same relationships between the three main effect knobs and an ‘omni knob’ for each bank. Here’s how:
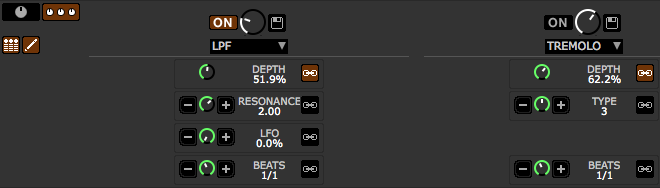
- Click the expand button (pictured) to show an effect’s advanced controls.
- Now, press the newly visible pencil button, which will open up the relationship controls.
- Move the dial to where you want it to be when the main dial is fully anticlockwise (‘off’) and press the ‘-‘ button.
- Now move the dial to where you want it to be when the main dial is fully clockwise (‘on’) and press the ‘+’ button.
- Make sure the link button is engaged.
Now when you turn the main dial, the advanced dials will turn the amount you’ve set up. If you set the controls to the opposite of the main dial – so that the advanced dial turns clockwise when the main dial turns anticlockwise – then the ring around the dial will be red instead of green.
PUSHING THE ENVELOPE
The super knobs and ultra knobs are obviously very powerful, but using Scratch Live’s native capability we’re limited to just one super knob per effect or one ultra knob per bank. If we use our MIDI intermediary software we can create as many as we like.
In testing, I learned two things about how Scratch Live treats MIDI input. Firstly, it’s got no issue with commands coming in simultaneously and so we don’t have to worry about creating delays between our message splitting. Secondly, it won’t learn the second in a string of MIDI commands even if you do put a delay in, so it’s necessary to build the MidiPipe template up with these steps:
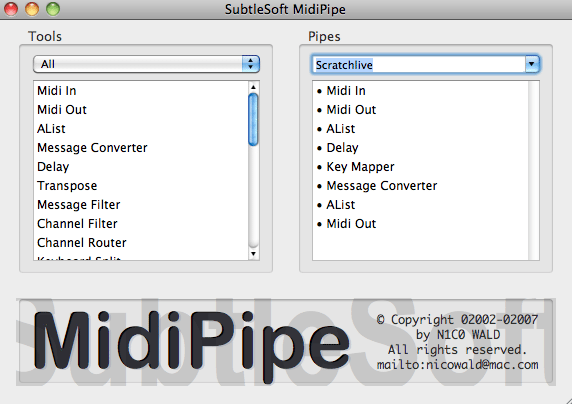
- Set up a MIDI in in your MIDI software.
- Set up a MIDI out to go to ‘Scratch Live MIDI in’ in the software, and ensure that ‘pass through’ is enabled.
- ‘Learn’ the first command in Scratch Live.
- Add a message converter, change the CC of your control to something else (it’s a good idea to plan out what you’re doing to avoid a mess down the road) and put it after the first MIDI in in your MIDI software.
- Now that the control has been switched, go back to Scratch Live and learn the next command.
- Return to the MIDI software and move the message converter to the end of the pipe, adding another MIDI out after it.
- For extra controls, repeat from Step 4.
THE NON-EFFECT EFFECTS
Scratch Live doesn’t count censor or loop roll as effects – this means that they can be used without taking up a slot in your DJ-FX rack. Whilst that’s all good, it also means they can’t be hooked up to super or ultra knobs, and so if we want to use them to their full potential we need to get a little creative with MidiPipe or the equivalent.
Here’s a trick that, whilst not super new, may have passed you by: instead of mapping a single loop roll button, you can map as many as you like to individual loop roll lengths by pressing ctrl+alt+click on the loop button in MIDI mode.
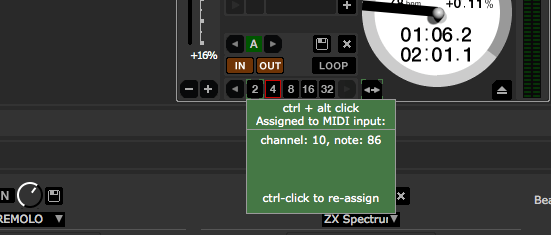
In a similar shortcut to the loop roll trick mentioned above, you can also ctrl+click on the effects activation buttons to turn them into momentary triggers. Try assigning loop roll activation and effects activation to the same button by creating a basic key mapper MIDI pipe and using these hidden momentary press controls for some very cool effects!
As a final note, because censor’s a button and Scratch Live doesn’t allow buttons to be triggered by specific values of CCs, we have to do some jiggery pokery in our MIDI software and turn our CC message into a note message. I use MidiPipe often because it’s very quick and easy to use, but when it gets to the more complicated actions, Bome’s Midi Translator Pro is the way to go. What we need to do is tell Midi Translator to turn only the final value on a single CC message (127, or 7F in hex) into a note on message, and also that the next one below (126, or 7E in hex) into a note off message. This will allow us to create a knob that can be assigned as we wish, but at the very end of its throw also sends things into reverse!
Subscribe to:
Posts (Atom)